How to Upgrade to Prisma 6 — Guide for a Clean Migration

Thinking of upgrading to Prisma 6 but unsure where to start?
You’re not alone.
The latest version brings faster performance, stronger type safety, and a new way to structure your Prisma Client — but it also introduces breaking changes you don’t want to mess up.
In this quick guide, I’ll walk you through the exact steps to upgrade, clean up your codebase, and keep your types in sync — without breaking everything.
1. Upgrade the Prisma Packages
Install the latest versions of both Prisma CLI and client:
npm install @prisma/client@latest
npm install -D prisma@latest
2. Update Your Schema Generator Output
In your schema.prisma, configure a custom output path for the generated Prisma Client:
generator client {
  provider = "prisma-client-js"
  output   = "../src/generated/prisma"
}
This moves the generated client outside node_modules and gives you full control over imports.
More details in the official docs.
3. Delete Old Prisma Client and Re-Generate
Clear any previous generated files and regenerate:
rm -rf node_modules/.prisma
npx prisma generate
You can find more information about generating Prisma clients on the new configuration.
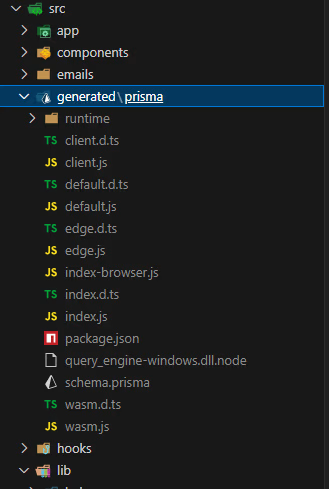
A folder named generate will be created in your project. It will contain all the files needed for the Prisma client.

Your Prisma Client should now live at:
./src/generated/prisma4. Update All Your Imports
Previously:
import { User, Post } from "@prisma/client";Now update to:
import { User, Post } from "@/generated/client";Use search-and-replace or a codemod if needed.
Now, in your initial database manager file, the prisma.ts or db.ts file depending on the name you use, you will use the new import like this.
import { PrismaClient } from "@/generated/prisma/client"
import { withAccelerate } from '@prisma/extension-accelerate'

const globalForPrisma = globalThis as unknown as { prisma: PrismaClient }

export const prisma = globalForPrisma.prisma || new PrismaClient().$extends(withAccelerate())

if (process.env.NODE_ENV !== "production") globalForPrisma.prisma = prisma
Prisma accelerate is optional; you can just use Prisma basically if you want.
5. Create prisma.config.ts for Type-Safe Generation
In your root, create a prisma.config.ts file:
import path from "node:path";
import type { PrismaConfig } from "prisma";
import "dotenv/config";

export default {
  earlyAccess: true,
  schema: path.join("prisma", "schema.prisma"),
} satisfies PrismaConfig;
This configures Prisma with better CLI and schema support. The code in this file allows you to manage your environment variables and settings more flexibly and improves the typesafe of the code generated by Prisma. You can add other preferences if you wish by consulting the official documentation.
6. Update TypeScript & ESLint Config
This configuration ensures that your current code is perfectly synchronized with the new Prisma model. This guarantees that your code is typesyfe and configures ESlint.
In tsconfig.json:
{
  "compilerOptions": {
    "target": "ES2017",
    "lib": ["dom", "dom.iterable", "esnext"],
    "allowJs": true,
    "skipLibCheck": true,
    "strict": true,
    "noEmit": true,
    "esModuleInterop": true,
    "module": "esnext",
    "moduleResolution": "bundler",
    "resolveJsonModule": true,
    "isolatedModules": true,
    "jsx": "preserve",
    "incremental": true,
    "plugins": [
      {
        "name": "next"
      }
    ],
    "paths": {
      "@/*": ["./src/*"]
    }
  },
  "include": ["next-env.d.ts", "**/*.ts", "**/*.tsx", ".next/types/**/*.ts", "src/generated"],
  "exclude": ["node_modules", ".next"]
}
In eslint.config.js:
import { FlatCompat } from '@eslint/eslintrc'

const compat = new FlatCompat({
  baseDirectory: import.meta.dirname,
})

const eslintConfig = [
  {
    ignores: [
      "src/generated/prisma"
    ],
  },
  ...compat.config({
    extends: ['next'],
  }),
]

export default eslintConfig
In .gitignore:
Add the generate folder to gitignore so that during your commit, it will not be processed and will be ignored by git.
# Prisma
src/generated/prisma
7. Run Migrations and Start Your App
Run a new dev migration:
npx prisma migrate dev --name upgrade-to-v6Then start your app:
npm run devWhat’s New in Prisma 6?
- ✅ Faster type generation
- ✅ Custom client path support
- ✅ Easier imports outside
node_modules - ✅ Typed config with
prisma.config.ts - ✅ Improved CLI with early access features
Full changelog: Prisma v6 upgrade guide
Want More Step-by-Step Dev Tutorials?
If this guide helped, you’ll love the weekly newsletter — packed with practical walkthroughs, upgrade guides, and real-world TypeScript tips.
Bonus: Performance Tips
- Run
npx prisma generateon build to avoid stale types - Use Prisma Extensions to customize Prisma Client logic in v6
- Cache your generated Prisma client during CI to speed up builds


