GeminiCLI: How to Install Google's Free AI Agent in Your Terminal
......
Loading...
Never miss an update
Subscribe to receive news and special offers.
By subscribing you agree to our Privacy Policy.
If you've been paying attention to the developer tooling space lately, you've probably noticed a trend: AI is moving out of the browser and into the terminal. And honestly? It's about time.
Google has launched Gemini CLI, an open-source command-line agent that puts the full muscle of their Gemini models right where most of us actually work — the terminal. No browser tabs. No clunky interfaces. Just you, your prompt, and a direct line to one of the most capable language models on the planet.
I spent the past week putting it through its paces, and I want to walk you through everything — from installation to real-world usage — so you can decide if it belongs in your daily workflow. Spoiler: it probably does.
At its core, Gemini CLI is an open-source AI agent that runs entirely in your terminal. Think of it as having a senior developer sitting next to you who can read your entire codebase, run shell commands, search the web, and generate code — all without leaving the command line.
It's built on top of Google's Gemini 3 models, which means you get access to improved reasoning capabilities and a massive 1 million token context window. That last part is a big deal. A million tokens means this thing can digest an entire large codebase in a single conversation. No more copying and pasting snippets into a chat window and hoping the model remembers what you showed it five minutes ago.
The project lives on GitHub under the Apache 2.0 license, which means you can fork it, modify it, contribute to it — whatever you need.
Look, there's no shortage of AI coding tools out there. So why does this one matter? Let me break down what caught my attention:
The free tier is genuinely generous. You get 60 requests per minute and 1,000 requests per day using nothing more than your personal Google account. That's not a trial. That's not a limited preview. That's the actual free tier, and for most individual developers, it's more than enough for a full day of coding.
It's terminal-first by design. This wasn't built as a web app that got a CLI wrapper bolted on as an afterthought. The terminal is the primary interface. If you're someone who lives in tmux sessions and has strong opinions about your shell configuration, Gemini CLI was built for you.
Built-in tools that actually make sense. Google Search grounding, file system operations, shell command execution, web fetching — these are all baked in from day one. You don't need to install plugins or configure extensions just to do basic things.
MCP support for when you need more. The Model Context Protocol lets you connect Gemini CLI to external services — GitHub, Slack, databases, you name it. This is where things get really interesting for team workflows.
It's fully open source. Apache 2.0. That matters for enterprise adoption and for developers who want to understand exactly what's happening under the hood.
One thing Google got right here is flexibility. There are multiple ways to install Gemini CLI depending on your setup and preferences. Let me walk through each one.
If you just want to kick the tires without committing to a global install, this is your move:
# No installation required — just run it
npx @google/gemini-cli
That's it. One command. npx pulls the package down, runs it, and you're in. Perfect for trying it out before you decide to keep it around.
Once you know you want Gemini CLI sticking around, install it globally:
npm install -g @google/gemini-cliAfter this, you can just type gemini from any directory on your machine and you're up and running.
If Homebrew is your package manager of choice, Google has you covered:
brew install gemini-cliClean, simple, and it'll handle updates through the usual brew upgrade flow you're already used to.
MacPorts users aren't left out either:
sudo port install gemini-cliThis one's for those of you working in locked-down corporate environments where you can't install packages globally. Anaconda gives you a sandboxed environment to work in:
# Create and activate a fresh environment
conda create -y -n gemini_env -c conda-forge nodejs
conda activate gemini_env

# Install Gemini CLI inside the environment
npm install -g @google/gemini-cli
I've seen a lot of developers in data science and ML teams who need this approach, and it's nice that Google documented it explicitly rather than leaving people to figure it out on their own.
Before you install, it's worth knowing that Gemini CLI ships on three different release channels. Picking the right one saves you headaches.
New stable releases land every Tuesday at UTC 2000. These have been through a full week of validation as preview builds, plus additional bug fixes. This is what you want for daily work:
npm install -g @google/gemini-cli@latestPreview builds drop every Tuesday at UTC 2359. They haven't been fully vetted and might have regressions. But if you want early access to new features and don't mind the occasional rough edge:
npm install -g @google/gemini-cli@previewNightly builds publish every day at UTC 0000, straight from the main branch. Expect bugs. Expect breaking changes. But also expect the absolute latest and greatest:
npm install -g @google/gemini-cli@nightlyMy recommendation? Stick with latest unless you have a specific reason not to. Life's too short to debug your tooling before you can debug your code.
After installation, you need to authenticate. Gemini CLI gives you three options, and the right choice depends on your situation.
This is the path of least resistance, and honestly, it's the one I'd recommend for most individual developers. Just fire up Gemini CLI and choose "Login with Google" when prompted:
geminiYour browser opens, you sign in with your Google account, and that's it. No API keys to manage, no environment variables to set. You immediately get access to the free tier — 60 requests per minute, 1,000 per day, Gemini 3 models with the full 1M token context window.
If you have a paid Gemini Code Assist License through your organization, you'll want to set your Google Cloud Project first:
export GOOGLE_CLOUD_PROJECT="YOUR_PROJECT_ID"
geminiIf you need to pick specific models or you want to manage your usage through API keys, grab one from Google AI Studio and set it as an environment variable:
export GEMINI_API_KEY="YOUR_API_KEY"
gemini
This gets you 1,000 requests per day on the free tier with a mix of Gemini 3 Flash and Pro models. You also get the option to upgrade to usage-based billing if you need higher limits.
For teams that need enterprise-grade security, compliance, and scalability, Vertex AI is the way to go:
export GOOGLE_API_KEY="YOUR_API_KEY"
export GOOGLE_GENAI_USE_VERTEXAI=true
gemini
This plugs directly into your existing Google Cloud infrastructure, gives you higher rate limits with a billing account, and comes with all the security and compliance features enterprise teams expect.
Alright, you're installed and authenticated. Now let's actually do something with this thing.
The simplest way to start is to navigate to your project directory and type:
cd /path/to/your/project
gemini
That drops you into an interactive session where you can have a back-and-forth conversation with Gemini about your code. It automatically scans the current directory, so it already has context about your project before you even ask a question.
Want to give it visibility into additional directories? Easy:
gemini --include-directories ../lib,../docsNeed a specific model? Use the -m flag:
gemini -m gemini-3-pro-previewThis is where Gemini CLI gets really powerful for automation. You can use the -p flag to pass a prompt directly and get a response without entering interactive mode:
gemini -p "Explain the architecture of this codebase"Need structured output for parsing in a script? Add the --output-format json flag:
gemini -p "Explain the architecture of this codebase" --output-format jsonFor monitoring long-running operations with real-time streaming, use stream-json:
gemini -p "Run tests and deploy" --output-format stream-jsonI find this incredibly useful for CI/CD pipelines. Imagine having Gemini analyze your code changes and generate a summary as part of your pull request workflow. We'll get to that in a minute.
Let me show you a couple of scenarios where Gemini CLI really shines, because abstract feature lists only go so far.
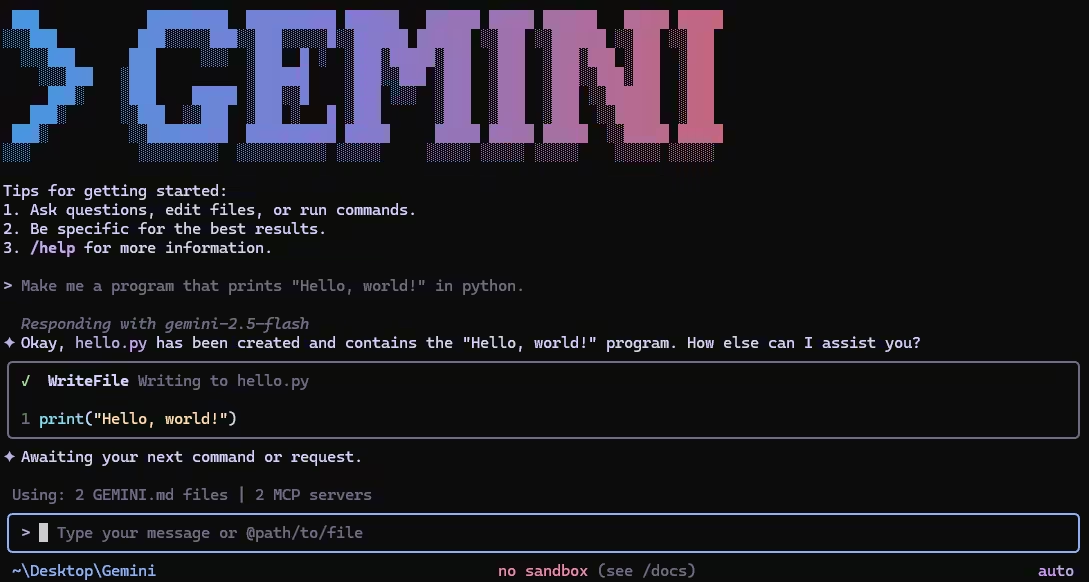
Say you need to build a Discord bot quickly. Navigate to your project folder and tell Gemini what you need:
cd new-project/
gemini
> Write me a Discord bot that answers questions using a FAQ.md file I will provide
Gemini will scaffold the project, generate the code, and walk you through the setup. Because it has shell access, it can even install dependencies and create files for you directly.
We've all been there — you clone a repo and spend two hours trying to figure out how the pieces fit together. With Gemini CLI, you can shortcut that process:
git clone https://github.com/some-org/some-project
cd some-project
gemini
> Give me a summary of all the changes that went in yesterday
With that 1M token context window, Gemini can actually hold your entire codebase in memory and give you meaningful answers about architecture, recent changes, and how different modules interact.
Gemini CLI can read and reason about large codebases, generate new applications from PDFs, images, or even rough sketches (thanks to multimodal capabilities), and help you debug issues using plain English. You describe the problem, and it figures out where to look.
You can automate operational tasks like querying pull requests or handling complex git rebases. Through MCP servers, you can connect Gemini CLI to media generation tools like Imagen, Veo, or Lyria. And with non-interactive mode, you can embed it into shell scripts for fully automated workflows.
One of the more interesting built-in features is Google Search grounding. When you ask a question that needs current information — say, about a new library version or a recent security vulnerability — Gemini CLI can hit Google Search in real-time to ground its response in actual, up-to-date data. No more hallucinated version numbers.
Working on a complex debugging session and need to step away? Gemini CLI lets you save and resume conversations. This might sound like a small thing, but when you've spent 30 minutes building up context about a gnarly bug, being able to pick up where you left off the next morning is genuinely valuable.
You can create a GEMINI.md file in your project root to give Gemini persistent context about your project. Think of it like a README specifically for your AI pair programmer — coding conventions, architecture decisions, things to avoid, preferred patterns. Gemini reads this file at the start of every session and adjusts its behavior accordingly.
This is where things get exciting for teams. Google built a dedicated Gemini CLI GitHub Action that plugs directly into your GitHub workflows:
@gemini-cli in any issue or pull request to get help with debugging, explanations, or task delegation.MCP (Model Context Protocol) support is what takes Gemini CLI from "nice personal tool" to "legitimate team infrastructure." You configure MCP servers in ~/.gemini/settings.json, and suddenly Gemini can talk to your external services:
> @github List my open pull requests
> @slack Send a summary of today's commits to #dev channel
> @database Run a query to find inactive users
Each of those commands connects to an MCP server that handles the actual integration. You get the convenience of natural language commands with the reliability of proper API integrations behind the scenes.
Here's my honest take after a week of daily use: Gemini CLI isn't trying to replace your IDE's AI features. It's filling a different gap — the one between your terminal and the AI models you wish you could talk to without switching contexts.
If you spend most of your day in a terminal anyway, this tool fits into your workflow without friction. The free tier is generous enough that cost isn't a barrier. The installation takes thirty seconds. And because it's open source, you're not locked into anything.
The 1M token context window alone makes it worth trying. Being able to ask questions about your entire codebase — not just the file you have open — changes the way you interact with large projects.
My suggestion? Run npx @google/gemini-cli right now, spend fifteen minutes playing with it on a real project, and see if it clicks. You've got nothing to lose and potentially a very powerful tool to gain.
Gemini CLI represents a shift in how developers can interact with AI — not through a separate application or a browser tab, but right inside the environment where the actual work happens. Google made some smart choices here: a generous free tier, multiple installation paths, flexible authentication, and an open-source license that removes adoption barriers.
Whether you're a solo developer looking for a faster way to understand and generate code, or part of a team looking to automate GitHub workflows and connect AI to your existing tools through MCP, Gemini CLI has something worth exploring.
The tool is actively maintained with weekly stable releases, and the open-source community around it is growing fast. Now's a good time to jump in.


